Introduction
Building your own storage furniture can be a rewarding and practical project. Not only do you get to customize your piece to fit your space, but you also gain the satisfaction of creating something with your own hands. However, to achieve a professional finish, careful planning and execution are essential. In this article, we will guide you through the steps to plan your DIY storage furniture project, focusing on advanced techniques in joinery, precision, and finish.
Step 1: Define Your Requirements
Before you dive into building your storage furniture, take the time to outline what you need. Consider the following:
- Functionality: What do you need to store? Clothes, books, tools, or craft supplies? The intended use will dictate the design.
- Space: Measure the area where your storage furniture will go. Consider height, width, and depth to ensure it fits appropriately.
- Style: What aesthetic do you want to achieve? Modern, rustic, or something in between? Your style will influence your material choice and design.
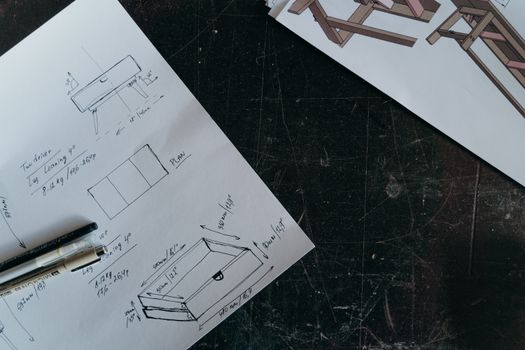
Step 2: Sketch Your Design
Once you have a clear idea of your needs, it’s time to sketch a design. A detailed drawing will help visualize your project and identify any potential issues early on. Consider using tools like CAD software for precision, or simply draw it out on graph paper. Ensure to include:
- Dimensions of every component
- Joinery types for each connection
- Material specifications
- Finishing details like hardware and paint or stain options
Step 3: Choose Your Materials Wisely
The choice of materials can significantly impact the final appearance and durability of your storage furniture. Some popular options include:
- Hardwoods: Such as oak, maple, or cherry, provide durability and a classic look.
- Plywood: A great choice for structural components, available in various grades.
- Medium Density Fiberboard (MDF): Ideal for painted finishes, as it provides a smooth surface.
- Hardware: Don’t forget about hinges, drawer slides, and handles. Quality hardware can elevate your project.
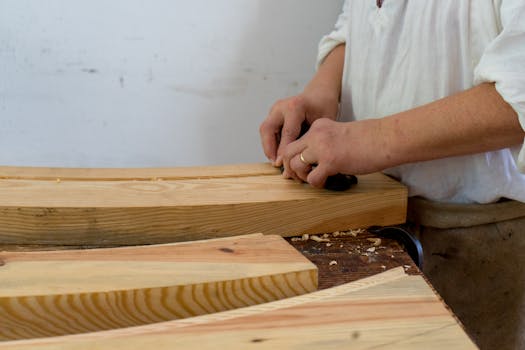
Step 4: Plan Your Joinery Techniques
Advanced joinery techniques can enhance the strength and aesthetics of your storage furniture. Here are some options:
- Dovetail Joints: Perfect for drawer construction, these joints are strong and visually appealing.
- Mortise and Tenon: A traditional method that provides exceptional strength for frames.
- Box Joints: Excellent for creating strong corners, especially in boxes or drawers.
- Pocket Hole Joinery: A modern technique that allows for quick assembly with hidden screws.
Choose the joinery methods that best suit your design and skill level. Each type has specific cutting requirements, so ensure your tools are up to the task.
Step 5: Gather Your Tools
Having the right tools will greatly influence your project's outcome. Here’s a list of essential tools for building storage furniture:
- Table Saw: For precise cuts and ripping large sheets of wood.
- Miter Saw: Ideal for crosscuts and angled cuts.
- Router: Great for adding decorative edges and joinery.
- Drill and Bits: Necessary for making holes for screws and dowels.
- Clamps: Essential for holding pieces together during assembly.
- Measuring Tools: Tape measure, square, and caliper for accuracy.
Don’t forget to check your supplies and order anything you might need in advance. A resource like Ted Woodworking can provide detailed plans and diagrams that can help streamline this process.
Step 6: Create a Work Schedule
Having a timeline will help keep your project on track. Break the project down into phases, such as:
- Material acquisition
- Cutting and joinery
- Assembly
- Finishing
Set realistic deadlines for each phase, taking into account your skill level and availability. Don’t rush; quality is paramount.
Step 7: Execute with Precision
As you begin construction, focus on precision. Measure twice, cut once, and take your time with joinery. Here are some tips:
- Use a stop block when cutting multiple pieces to ensure uniformity.
- Double-check your angles with a square before making cuts.
- Dry fit your pieces together before final assembly to ensure proper fit.
Step 8: Finishing Touches
The finish is what will give your storage furniture its professional look. Consider:
- Sanding: Start with a coarse grit and progress to a fine grit for a smooth surface.
- Staining or Painting: Choose a product that complements your wood choice.
- Sealing: A clear coat can protect your finish and enhance durability.
Apply finishes in a well-ventilated area and follow the manufacturer’s instructions for best results.
Conclusion
Planning your DIY storage furniture project with an emphasis on advanced techniques in joinery, precision, and finishing will yield a piece that not only serves its purpose but also showcases your craftsmanship. Remember, woodworking is an art that improves with practice, so take your time and enjoy the process!
FAQ
- What type of wood is best for storage furniture? Hardwoods like oak or maple are ideal for durability and aesthetics, while plywood is great for structural components.
- How can I ensure my measurements are accurate? Use a tape measure and a square, and double-check your dimensions before cutting to avoid costly mistakes.
- Where can I find reliable woodworking plans? Resources like Ted Woodworking provide a variety of detailed plans to help you get started on your project.
📚 Related Articles
🔨 Want 16,000+ Woodworking Plans?
Get instant access to step-by-step plans with blueprints and cut lists.
Get Instant Access →